
Photo Submission Tips
|
Remember, AND WE CANNOT STRESS THIS ENOUGH, the detail of the final portrait is directly related to the quality and focus of the photos that you send. We can work with images that are less than perfect, but to insure the best portrait, your photos should be as good as possible. We can work with either digital images or photos taken with film, but in either case we must receive the picture in its original format. In other words, if your pictures were taken with a digital camera we need the original digital images from your camera; and if your pictures were taken with a camera using 35mm film, we need an original print from a professional photo lab or negative to scan (or you can scan it yourself at a high resolution setting). Unfortunately, we cannot work with any pictures that have been printed or reprinted on an inkjet or laser printer at home or at a printing kiosk at a department or drug store. We realize you may not be a professional photographer, and of course we can work with images that are less than perfect. However to guarantee the best possible portrait of your pet you should submit the best possible pictures. Below are some tips to help you: You are going to take a photo If you are going to take photos of your pet specifically for the purpose of having us create a portrait for you, the first thing you'll need is patience and lots of it! Pets make lousy models, so it's going to take some time to get the perfect shot. The second thing you will need is help! Unless your pet is an exceptional ham for the camera, you will need somebody to try and attract and hold their attention with treats and silly noises. You may even need your helper to hold your pet, which is fine as long as hands and arms aren't covering any important markings or conformations. The best way to approach the project is to imagine that you're taking your pet's picture for the school yearbook. In other words, you should try and take a head and chest shot from your pet's eye-level. We do not suggest standing and pointing the camera down at your pet. Also, you'll want to get close enough to your pet so that they almost fill the frame. The best location for your photo shoot is outdoors but not in direct sunlight, in the shade or perhaps just after sunset, or better yet, on an overcast day. We further recommend using the flash even though you're outside, to add light to your pet's face and help balance out the shadows. A special note if your pet is black or very dark colored, their dark fur may absorb the light and, when photographed they may look like a black blob in the picture. This is why front light is best for shooting animals whose coats are black or very dark brown, to help provide contrast. Solid white or very light colored fur can pose the opposite but equal challenges, as the detail and contrast of their features may get washed out by too much light, so try some shots with and without the flash to see which works best. If you would prefer to use a candid shot rather than trying to conduct a formal photo shoot, you'll just need to plan ahead. For example, does he look at you longingly when you are about to feed him? If this is the pose you love, then have a freind or family member snap some pics while he's waiting. Or, here's a suggestion, keep the camera handy and just as they're nodding off squeeze the squeak toy, you'll get a moment of alertness and a brilliant pose! These special moments, that show your dog or cats personality, can quite easily be captured with a little preparation. Finally, focus, focus, focus! Because we can only work with what we see in the photos, focus is the most important factor. The clearer and more focused the photos are, the more detailed your portrait will be. If the photos are blurry then guesswork has to come into play and your portrait won’t be as accurate as it could be. If you find that you are getting out of focus photos, it may be due to camera shake. If you don't have access to a tripod, try leaning on an object or a wall, or lay on the floor and lean on your elbows. Most digital cameras have auto focus, which automatically focuses the camera at your subject's distance. This is very handy as the camera will allow for various light conditions, some can even compensate for camera shake. To activate the auto focus function on most digital cameras you just have to press the button half way down and give it a couple of seconds to adjust before snapping. Once you have some photos you would like us to consider, you have a couple of options on how to get them to us. If your photo was originally printed from film, you can send it to us via
regular mail and let us take care of the scanning and resolution,
or you can scan them yourself. Digital images can be emailed
to us at
If you'll be scanning a photo First, please consult the section above on taking a photo to make sure the photo(s) you will be scanning are good candidates for your portrait. Then begin with the original print, we cannot work with an inkjet print that has been scanned. For best results scan your photo(s) at a resolution of 300 dpi or higher. Your scanning software should allow you to specify the size of the scan, you may need to refer to the advanced settings and options. If you are unsure of how to check the resolution before you scan, check the file size after you scan the picture and before you send it. Your file should be a minimum of 1MB, and will likely be larger. The preferred format is PNG, TIF or JPG (highest quality). Once you have your photo(s) scanned in you can send the file(s) via email to us at If in doubt, send us the photo via regular mail and we will do the scanning for you. Your original photo will be returned to you with your completed portrait.
If you're using a digital camera If you are experienced and comfortable using your digital camera, there are just a couple of things we would ask you to please do when taking and submitting your digital images to us:
If you don't know a mega pixel from a megabyte, here are some more elementary terms you may want to familiarize yourself with: Image size - Most digital cameras will allow you to set the size at which pictures are taken. This setting can be found in the cameras menu. Generally set it to the highest number or option available. Megapixels - Digital cameras are measured in mega pixels, the theory is that high mega pixel cameras show greater detail in the images and the images are larger. Our current digital camera is 5 mega pixels and for taking photos for dogs, family and every day use this is perfect. A good quality 4 or 5 mega pixel camera should produce great quality photos. Memory Card - Digital cameras store the pictures on memory cards. Think of the memory card as a roll of film with the added benefit that the card can be used over and over again. There are many different types of memory cards available but normally a digital camera is compatible with just one type of card so make sure that the card you buy is the right type for your camera. A memory card will come with a new digital camera as standard but you may like to buy a second higher capacity card to enable you to store more photos. The capacity of memory cards is measured in megabytes, common capacities are 64mb, 128mb, 256mb, 512mb. The more megabytes, the more pictures you can store before downloading them to your computer. Digital/Optical Zoom - Digital zoom is a feature that enlarges the subject within an image to fill more of the frame. Using a digital zoom reduces the resolution and quality of an image. It is preferable to use optical zoom, which actually magnifies the size of an image by adjusting the lens. Using optical zoom means you can get closer to your subject without sacrificing quality. Now that you're an expert, please refer to the requirements listed in the beginning of this section. You can refer to your camera's manual for instructions on how to set the quality of your photo, and be sure and send us your images in their original size. We have some examples of high and low quality digital images below that might help you decide if your digital photos are suitable candidates for your portrait. Once you have some digital photos you would like us to consider, you have a couple of options
on how to get them to us. You can email them
to us at
If the animal is no longer with us Approximately 30% of the portraits we do are of beloved pets that are no longer with us. Often in these cases we realize your choice of photos is very limited. We are always honored to be commissioned with these memorials, and simply ask that you communicate your limitations to us, submit the best photos you can find, and we will do the absolute best that we can.
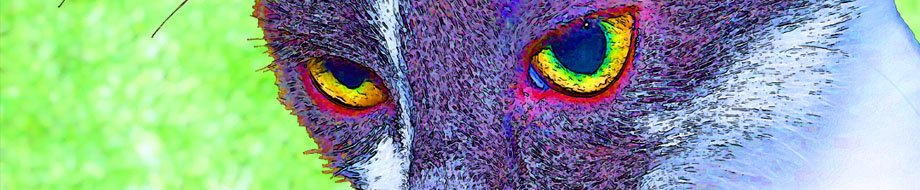
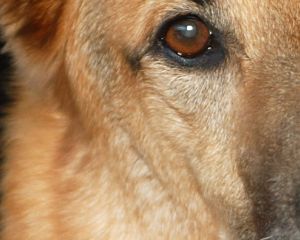
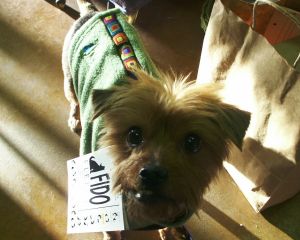
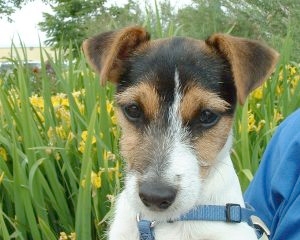
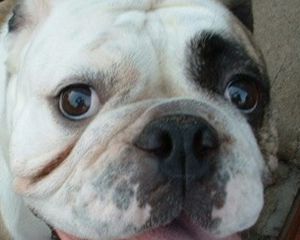
The bad and the good, some examples Hopefully some of these examples will help you to understand what a good photo and scan would look like. We provide details of the issues below the individual images.
|
|||||||||||||||||||


TESTIMONIALS | AFFILIATE PROGRAM | CLIENT PROOFS